Sunday, November 21, 2010

Solder Play

I've been taking Stephanie Lee's Homesteaders 2 online class.  Here's a few pics of my works in progress.

first floodings

These are small pieces of brass that I flooded with solder.  I'm satisfied with the flooding, except for the bottom two that I used a different solder on, but my bezel making with the copper pipe isn't going so well.

first copper bezels soldered


The solder is kind of grainy looking after I heated it again to solder the bezels.  And I'm having trouble getting the bezels covered completely with solder on the outside.  I need more practice but I'm having fun with the class. I've antiqued the bezels above with Novacan patina.  It did cover the little bare copper spots. I think I'll go for a "dug up at an archeology dig" look with whatever I put in them. Until I can do better things are going to look rustic.

Tuesday, November 16, 2010

Chain and Bead Jewelry, Geometric Connections

Scott David Plumlee makes chain jewelry very approachable and the designs are fresh and engaging. I've always been interested in chain jewelry but before I saw this book it seemed too time consuming and imposing.


I got excited when I thumbed through this book and saw all the earring and pendant designs.  One of the most versatile designs is the Tripoli.  I have lots of ideas for using the Tripoli formation in different ways.  Following the directions in the book I made some 18 gauge copper jump rings and made this Tripoli formation:

Tripoli chain formation


It's about an inch high and will be perfect for some earrings when I get a second one made. I sawed all the rings, except for the one on the top right which I cut with pliers.  I need to file it a little.  Plumlee's design in the book called for rings in copper, bronze, and silver.  Since I'm a newbie at this I made mine out of copper.

Plumlee uses the Tripoli formation and other formations as pendants woven into Byzantine and other chain necklaces. The geometric designs also include dimensional  earrings, necklaces, bracelets, and key fobs. Gemstone beads augment many of the designs. 

Chapters 1 and 2 cover basics and tools. Several tables show measurements in both metric and inches.

Chapter 3 covers variations of Byzantine chain and shows several ways to use it with other chains and geometric connections.  Chapter 4 illustrates the very interesting Tripoli formation.  This formation is a building block for most of the designs in the book. It's amazing how many ways it can be combined, either with other Tripoli formations, or with other chains and beads. Chapters 5 through 7 cover triangle, quatrefoil, trapezoid, and pentagon formations.

Several organic forms are covered in Chapter 8, including beaded fish, cross earrings, snowflakes, and butterflies.

 Photography is excellent throughout the book.  The color photos are presented on a white background, and are larger than life size.  There are step-by-step photos accompanying all the instructions as well as many photos of finished jewelry.  Mixed metals are used throughout the book, making it easy to follow the instructions.

Seven chain styles and two flower formations are covered in the book, but the focus of the book is on the geometric shapes.    There's a two page spread that shows all the aspect ratios and indicates the mandrel sizes to use for specific aspect ratios in different gauges of wire. 

The appendix details the use of Argentium silver and how to make headpins with a torch.  Also included are color diagrams of chain variations.  A note in this section refers readers to Plumlee's website for chain configuration tutorials.

Chain beginners (like me) can do one of the smaller projects and have a completed project in a short amount of time.  Intermediate and advanced chain artists will find lots of inspiration and many different and challenging ways to use geometric forms.


Disclosure: The publisher provided a review copy of this book.

Monday, November 15, 2010

And the Winner is...

Shelby of sundownbeaddesigns is the winner of Stephanie Lee's Semiprecious Salvage.  Congratulations Shelby! 

Thursday, November 11, 2010

30-Minute Earrings--Not Your Average Earrings!

This is one of the most inspiring jewelry making books I have ever seen. I'm so glad I purchased this book.

 While there are some beginner projects, many of the projects require metal working skills and tools that a beginner jewelry maker would not have. A beginning metalworker, versus someone who has only done basic bead stringing, could do well with these designs. There are also some designs using metal clays, rather than traditional metalwork.


Some designs call for a rolling mill to pattern metal, but the designs could be made with metal patterned in other ways, like etching or hammering. It's not necessary to have every tool mentioned.

 
I'm pretty sure that many of these would take ME longer than 30 minutes to make. I intend to put this book on my bench, practice and hone my skill on these designs until I can make them in 30 minutes. I love this book!

 The table of contents is pictorial. This makes it very easy to see what page a certain design is on and quickly turn to the instructions.

 The photos are clear and close-up. The photos are all of the finished jewelry or a detail of the finished earrings. There are some line drawings of templates. There are no step-by-step photos.

 The designs are modern and unique. Just leafing through the book gave me inspiration for many different designs. Several of the designs gave me ideas on ways to improve some of my own designs, even though I use different techniques with my designs.


This book is good for those wanting to take their skills to a new level, and for those seeking inspiration with their own designs.


Tuesday, November 9, 2010

Homesteaders 1 & 2 and Book Giveaway

During the summer I had the pleasure of taking Homesteaders' Metalsmithing,  an online  course by Stephanie Lee.  One of the major things I learned was soldering with a torch.  I had some reservations before the course began about whether the online format was a good one for learning to solder, but my fears were completely unfounded.  The class was fantastic!  It's a combination of blog posts, pdf's, videos, and a wonderfully energetic and supportive yahoo group email list.  I learned a lot but didn't get as much done as I'd hoped (I was getting ready for Red River Revel and got sidetracked making jewelry for it.) 

I signed up for Homesteader's 2, which started this week. New material is being introduced in this session, although much of the material is a repeat. The class runs five weeks instead of four. The material is available on-line for several months so the videos and other material will be available for review. One of the new subjects is use of a rolling mill. I gifted myself with an economy model rolling mill after Red River Revel so I'm looking forward to this part. Hopefully I'll get a lot more practice this time around as well as learn some new things.


I ran out to Sears today and got a stand for the bench grinder. We didn't have a place in the garage to mount it and now we do! And it wasn't expensive or hard to put together. Plus, plus! During the last class I did all the filing on the little brass squares and rectangles by hand and it took way too long.


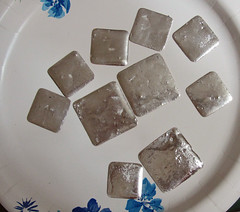
I finished some components but not soldered pieces in the last class.  My friend, Bren, sent me some pictures to use. Didn't she do a great job?  Bren and Julie and I met at Adorn Me! last year and all three of us took Stephanie's online class.


The photo above is Elvis Presley as a child.


Bren used a napkin ring and a clip on earring in this pendant.


This pendant utilizes a skeleton key and scrapbook paper.


This is a dried daisy in an antique bezel, with resin.


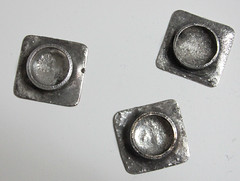
A handmade bezel with a photo behind resin, and a screw back earring.


Bren cleverly used some hardware trim on this one.


Check out Julie's blog HERE and look at her work. 

Now for the giveaway.  Homesteader's 1 included a copy of Stephanie's great book, Semiprecious Salvage.  Reading the book is like taking a class.  I love the story format she uses, and the multitude of close up photos.


I already had a copy of Stephanie's book so now I have two.  You can win one of them by commenting on this post.  If you post it to Facebook or tweet it you can get another chance. Tell me about it in separate comments.  Just be sure I have a way to get hold of you, either through an email linked to your profile or leave me your email address. You can spell it out:  "name at suchandsuch dot whatever" instead of using the symbols.  The deadline for comments is noon CST on Monday, November 15th.  Due to the incessant spamming comments by people promoting links to  "adult" sites I've turned comment moderation on.  I'll be out of town on some day trips this week, so don't get stressed if your comment doesn't doesn't get approved right away.  I'll get to it! 

Wednesday, November 3, 2010

Mystery Beads

My aunt gave me a strand of interesting beads that she got at an estate sale.  They look like African trade beads to me, but I've seen a lot of trade beads and I've never seen these.  If you click on the photos you can look at much larger versions on flickr. If the first one isn't large enough,  click on the photo on flickr, go to actions, all sizes, then click the size you want to view.

mystery beads

The strand is about 24 inches long. The long broken bead in the middle is at one side of the strand, opposite the red beads.


mystery bead detail 1

I think the red beads are plastic but I'm not sure. The black beads appear to be horn.


mystery bead detail 2

The dots on the beads appear metallic. It looks like they were applied. Some aren't flat. If I scrap them with my fingernail they get really shiny like some sort of metal, or metallic paint. The stuff that scraps off looks like some sort of corrosion. If anyone knows what these are please let me know.


mystery bead detail 3


update 11/10/10:  I posted about these on the wire wrap jewelry list on yahoo and Perri (who has a similar donut and has seen a strand of these belonging to a collector) replied in part: "...The dots are most likely metal rod inlay (yeah, I know - think about the time
and work - AMAZING!)

The drop beads are definitely horn, look at the striations in the small part
next to the hole - this is also how you can tell they are older - because
although they are pretty well kept, they have dried out enough that the
*growth rings* in the horn can be seen easily. When they were new, they were
probably smooth as the proverbial baby's bottom, as were the inlay beads. My
donut is roughly 25 years old, and still smooth."


I think Perri's right.  I had wondered how the dots could be so uniform in shape and size.  Using rod inlay makes perfect sense.  And it explains why they look metallic--they're metal. 


Thanks to everyone for their emails and info.  And if any reader has more info please comment!