Tuesday, August 30, 2011

Key Giveaway--The Reveal

First of all let me apologize for posting this so late.  I had a very interesting day and not in a good way.  Mostly it involved the water well at my parents place and my car.  Probably I will soon have another car, which unfortunately will come with a car payment. 


I selected a winner by numbering the comments, with extra numbers added in for those who had more than one entry.  Here it is:


The winner is Patty from "My Life Under the Bus."  Congratulations Patty!  I did post this on Patty's Facebook so some of you have probably already read this.  


Patty selected the mauve/lavender key.


The white pearls are big hole pearls so they are excellent for wire wrapping.  Also included are some more pearls and some fluorite. The pearls have a funky shape but the color is to die for. There's a lot of color that didn't photograph. 


And some Czech glass.


And finally 2+ yards each of my favorite colorfast hand-dyed sari silk ribbon:


After I took all the photos I realized I hadn't photographed the matching copper washers, but they are included.


I have another giveaway, this one a book and metalworking supplies, coming up soon so if you didn't win this time check back. 

Monday, August 29, 2011

August Reader's Challenge II

I'm only partway finished with the wonderful beads and focals from this month's Readers Challenge from Andrew Thornton


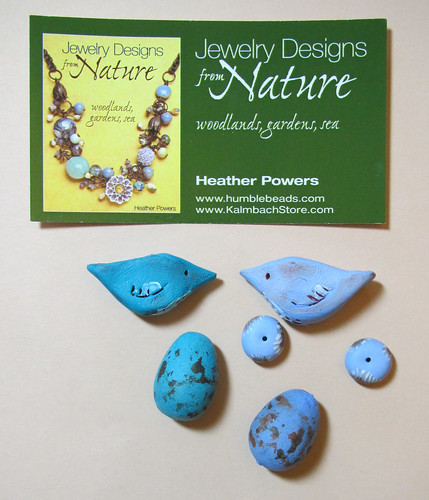
Here's a picture I took of the challenge beads:


 August Reader's Challenge

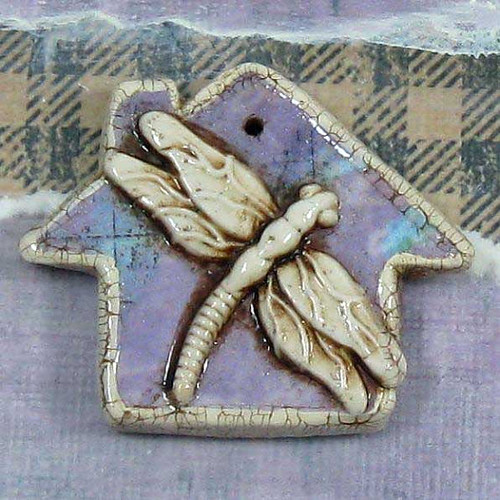
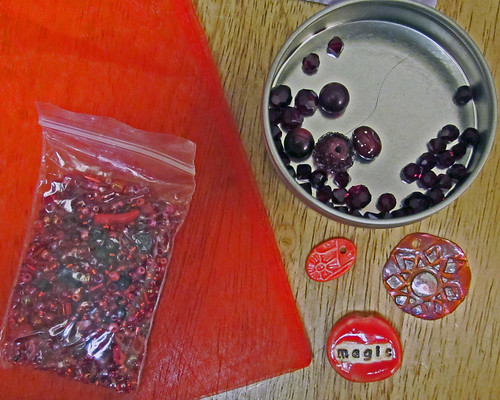
The challenge beads include a ceramic magic bead  by Diane Hawkey, a floral charm by Marsha Neal, a silvered lampwork bead by Sue Kennedy, a lampwork bead (scarlet sugar bead) by Bernadette Fuentes, a seed bead blend, Swarovski crystals, vintage acrylic, and copper chain (not shown) and the mystery focal--a copper pendant by Andrew Thornton. 


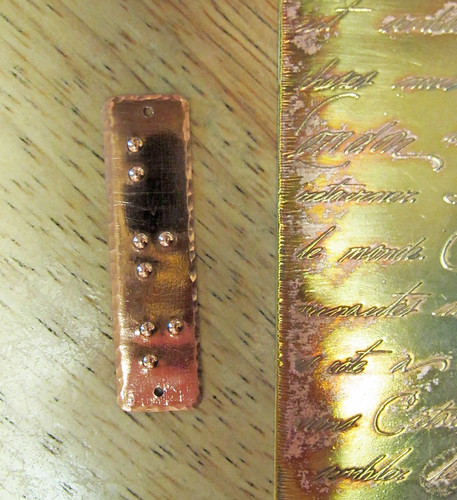
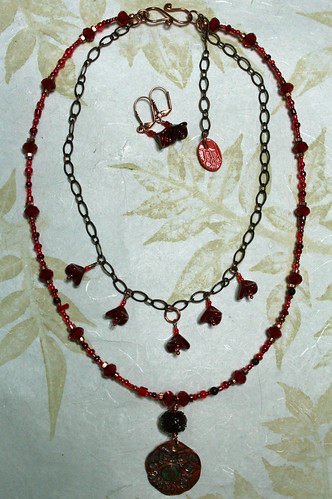
As soon as I saw the beads I wanted to split them up into two necklaces.  I decided to put the floral charm and the sugar bead in one necklace.  The copper pendant has a stylized sun so I decided to go with a nature/flower/sun theme. I made a copper clasp to  go with this necklace.  For some reason my flash decided not to work so these are a bit dark. 


Reader's Challenge necklace 1


I gave the magic bead a lot of thought.  Magic has more than one definition and I decided to work with the theme of magic as illusion.  I researched historical female magicians and illusionists and settled on Mercedes Talma. Mercedes performed from 1899 through the 1920's.  She was known as the "Queen of Coins" for her skill in manipulating coins and making them appear seemingly from the air.  She confounded viewers during performances by wearing an off-the-shoulder gown that lacked sleeves in which to conceal the coins. 


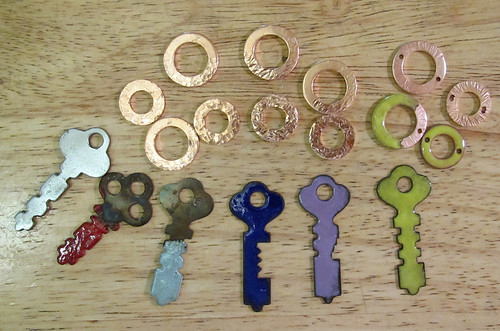
Keyholes invoke the idea of mystery and things hidden so I decided to have Mercedes peeking out from a keyhole.  This is what I have so far:  

Reader's Challenge necklace 2

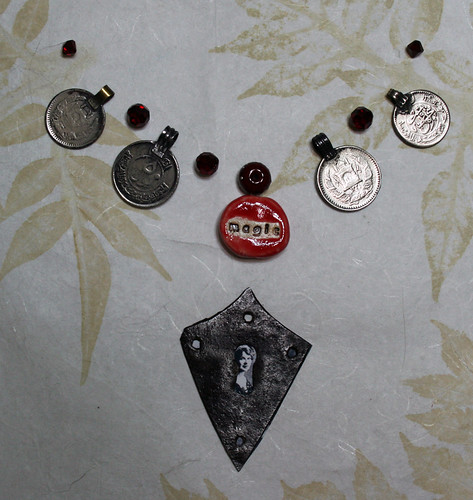
The escutcheon plate is iron and had surface rust.  I cleaned the rust up but left it dark as much as I could.  It's been coated with ProtectaClear to prevent any more rust.  The photo is one I found of Mercedes Talma.  The escutcheon plate will be backed with an etched brass plate and it will be riveted together. I'll probably darken the brass considerably so it doesn't stand out too much from the silver tones of the necklace.  Right now I'm thinking of wire wrapping the beads together with sterling silver, which I will antique.  I've had these Asian coins for a while and I thought they would go well with the "Queen of Coins." I'll probably use all the crystals that were in the challenge kit on this necklace, and some sterling spacers. 


Here's a list of the other challenge participants.  Check out their designs:  


Darby Lohrding, Marian Howarth, and Kari Asbury will all have pieces featured on Andrew Thornton's blog.


I still have a giveaway going until noon (Pacific time) on Monday 8/29.  Scroll down to the previous post. I'll notify the winner later on today but the reveal post will be tomorrow.

Wednesday, August 24, 2011

Bead Table Wednesday--Torch Enameling and a Giveaway

Yesterday and today I've been playing a little with torch enameling.  I haven't gotten much done but I'm having fun.  


Here's what I've been working on: 


practice enameling pieces

Sorry it's such a poor picture.  The steel keys had rust on them and I used the buffer to get that off.  The key on the left has been cleaned but not enameled.  I used two methods to enamel.  I heated the second and third key from the left until red hot and dipped them in the enamel a couple of times, following directions in Barbara Lewis's excellent new book. I did the Robin's egg blue one first.  I was pleased with the enameling, although I didn't get it as high up on the key as I would have like.  I had some problems with the red one.   It threw off sparks or little burning embers when I was heating it.  This caused the enamel to pit.  I have no idea what caused this but hubby theorized it was bits of carbon flaming up.  I haven't cleaned the oxidation from the flame from any of the keys.  I rather like the oxidation on the three right hand keys so I may not remove it on those. 


The three keys on the right were done by sifting enamel onto one side and torching from below on a tripod.  I'm pleased with the way they turned out. 


Next I textured some copper washers.  I've just begun to enamel them.  The half enameled one was done by the dip method and the small one was done by sifting.  The small one is textured on the back side and the larger one that I dipped is textured on both sides of the top.  The bottom hole filled up with enamel so I'm going to have to rethink that. 


I'm so pleased with how the keys came out that I'm going to have a little giveaway.  I'm giving away your choice of one of the keys on the right:  cobalt, mauve, or bitter green.  (The mauve looks lavender to me and the bitter green is a yellow green but those are the enamel names.) I'll also be including enameled copper washers and some other items which will be determined after I go through my stash and find coordinating goodies. 


To enter leave a comment on this post.  Post on Facebook or follow the blog for extra chances.  Just leave me a comment letting me know (if you already follow leave a comment) and be sure I can contact you through your comment or include your email address. I'll cut the comments off at noon on Monday and select a winner sometime later in the day.  Good luck!

Tuesday, August 23, 2011

Great New Metal Working Books--Reviews

There are a number of really fine new books out for jewelry artists.  I'll be reviewing several of these over the next few days, plus a giveaway a little later. 


I sometimes get review copies of books from publishers but the two books I'm reviewing today I purchased myself.  Both of these are great books.


First up is Kim St. Jean's Mixed Metal Mania. The subtitle is Solder, rivet, hammer, and wire exceptional jewelry.  


The book is divided into five sections.  The first section is about tools and techniques. My favorite part of this section is "Kim's Unconventional Tools," and "Kim's Tips." 


The four project sections are designed to build on the techniques learned in the previous sections. Kim states in her introduction that all the projects have been tested with students and each project is designed to teach and practice a specific skill. I think Kim's extensive experience teaching is well reflected in the projects. 


Chapter One includes techniques such as texturing, patina, cold connections, annealing and fold forming. Projects include rings, earrings, scarf pin, collar and pendants. 


Chapter Two includes the use of several different techniques in soldering, the rolling mill, forging and wire wrapping.  Projects include several pendants, including a three dimensional one, rings, a bangle, a bracelet, a chain, and two pairs of earrings. 


Chapter Three makes extensive use of propane or acetylene torches. Techniques include reticulation, soldering, riveting, pine straw casting, making a bail and bezel setting a stone.


Chapter Four has more complex projects involving foldforming, bezel setting, and other techniques.  


I especially like the foldformed projects in this book.  Kim's writing is clear and the projects and techniques are well illustrated with color photos. It's easy to see how you can take the techniques and skills learned through this book and apply them to your own unique designs.  
 ###


The second book I'm reviewing today is Karen Dougherty's Metal Style.  It's subtitled "20 jewelry designs with cold join techniques." 


The book begins with two sections on tools and techniques.  This is followed by a large section on projects.  There are 20 projects from 16 different designers. Designers include well known artists and instructors such as Robert Dancik, Thomas Mann, Janice Berkebile, Connie Fox and others.  The projects represent a broad range of style, as you would expect with a number of designers, and in addition to metal include some other materials such as resin, resin clay, faux bone, polymer clay, Lucite and several found objects. A number of the projects are complex, at least in the number of steps, but there are others with fewer steps that would be good for a student who has just learned to rivet and saw from the instructions in the front of the book. 


Some of the included projects are a riveted chain by Janice Berkebile, a hinged pendant by Dawn Bergmaier, a found object sandwich adjustable ring by Thomas Mann, and a found object necklace  by Kim St. Jean. 


Both these book are great addition to your metalworking library. 


Wednesday, August 17, 2011

Bead Table Wednesday--Tools and Beads

First up, I've got these awesome beads that just arrived today from Heather Powers:


beads from HumbleBeads

I love these little birds and eggs! Heather also has a new book out--that's it on the front of the card.  I was hoping to get a look at it but the bookstore didn't have it yet. 


While organizing in the studio I found a set of number stamps that had rusted right in the storage box.  Yikes!  After a lot of elbow grease with a brass brush on one of them  I decided it was time to break out the new buffer/grinders.  


new buffer/grinders

Not too long ago I paid my teenager to put this nifty bench from Sears together.  I found this plywood at Home Depot and had them cut it into two tops with a piece left over.  I used the one on the left with the fiber brush (also on the left) to clean the rust off the stamps.  I bought this little grinder just for that brush.  I used one like this in Richard Salley's toolmaking class at Adorn Me, and I loved it. One of the stamps got away from me and was spun across the room by the grinder, hit a plastic container and bounced almost all the way back.  Of course, I had eye protection on, but I started putting a cardboard box behind the grinder to catch things, and I paid better attention after that. 

Then I put some Boeshield T-9 on the stamps and also on the hammer head of my new Fretz Michael Good hammer.  Boeshield T-9 is a waterproof lubricant and rust and  corrosion protector.  You wipe it on then wipe it off.  It is petroleum based, but dries to a hard waxy finish.   I love it for tools. Here they are drying. 


tools


A couple of days after setting up the grinder I set the second one up.  It has a cotton type buffing wheel and I used it to buff a pendant I'm working on.  The wheel's too small for a lot of things, but it is still handy and I may move this one into the studio later.  Right now they're in the garage.  I do have a full sized buffer from Sears, but I've got to sit down and read the instructions and get the parts put together before I can use it.  It's not as "plug and play" as these little ones are.  Both these grinders have flex shafts that attach to one side.  I don't plan on ever using them.  


And here's what I hope never gets in the garage or on the bead table:


two adults and three young ones

The two on the left are full grown and the three smaller ones on the right belong to one of them.  I haven't seen the other one's babies, but she appears to be nursing.  The raccoons have been devoring the cat food at an alarming rate.  Feeding the cats only in the day doesn't help because the raccoons just come out in daylight.  Those mamas are really hungry.  After they quit feeding the young I won't see much of them until next breeding season.  I found some out-of-date peanut butter last night in the pantry and have been doling it out.  They like it so well they have been leaving the cat food alone. According to wikipedia it's probably better for them than cat food. 


baby raccoon

This is either the bravest, or the least intelligent of the babies. He's was about five feet from me when I took this. He's not super frightened of me like the other two babies are. They see me and go up a tree.


We have a lot of ponds in our area but they must all be dried up because the raccoons empty all three of the water bowls every night.  One is quite large and sometimes they lay down in it. I guess raccoons need to bath sometimes. 


Check out the other bead tables on flickr.


Monday, August 15, 2011

August Reader's Challenge

I signed up for the August Reader's Challenge by Andrew Thornton.  Read about it here.


 August Reader's Challenge

Here are the beautiful challenge beads. Don't you just love the artist beads? Two are lampwork, two ceramic, and one copper clay. The beads are much prettier in person.  This isn't a very good photo.  


Jazz cat seemed to like these beads.  She kept trying to sleep on them.  I guess little tins aren't as uncomfortable as they look.  And look: there's already a cat hair in there. That's a real hazard at my place.  The cats take their duty to shed on everything very seriously.


The big reveal is on the 29th of August and they'll be a blog hop among the participants. This is a color I don't work with very often, although I love it.  Using a color I don't usually use is part of the attraction.  It will be fun!

Saturday, August 13, 2011

Hot Connections Jewelry--A Review


I received a review copy of Hot Connections Jewelry, The Complete Sourcebook of Soldering Techniques by Jennifer Chin. 


Chin writes that she "conceived of Hot Connections Jewelry as an easy-to-follow resource for people who have experience making jewelry  with beading, wirework, or cold-connection techniques and want to expand their skills to include soldering in their creative repertoires". I  think she has achieved her goal and created a great guide to soldering with much more than soldering in it.


The book is profusely illustrated with color photos as well as very detailed sketches.  


There are six sections. Each section contains an overview of the subject, lessons, and projects. There are also gallery photos in each section.  Each gallery photo includes a short description of how the item was made. I found these descriptions very useful. The jewelry throughout the book is modern in style with clean lines, and graphic shapes. 


Section One covers the nitty gritty details on how soldering works, choosing and using torches, metal, and workspace.  I really like the annealing color chart that was included in the section on using torches, as well as the review of safety procedures.  Lesson One is on annealing sheet metal. 


Section Two details basic fabrications techniques such as sawing, shaping, and riveting, among other techniques.  There are step-by-step lessons on each technique.  


This section also contains the basic soldering overview including solder and flux, soldering tools, soldering methods, and pickle. The solder and flux section has useful charts on solder melting points & uses, and silver solder melting and flow temperatures.  Soldering methods covered are chip (pallion) soldering, wire (stick) soldering, pick soldering, and sweat soldering (tinning).  


Chin discusses standard pickle but also gives a recipe for the less toxic version of pickle made from vinegar and salt.  I was glad to see the vinegar/salt recipe as I feel it is an excellent pickle, less toxic, and much underused.


The first soldering lesson on soldering a seam is in Section Two. The first three projects are also in this section: riveted collar ring, ribbon earrings, and fizzy pendant.  If you went no further in the book you could take what is learned in these three projects and create a multitude of projects of your own. 


Section Three covers forming metal: scoring & bending, forging and dapping. The three projects in this section are my favorite: domed petal earrings, forged chain necklace, and retro bracelet. 


Section Four explains textures, patinas and finishing. I was happy to see embossing with a rolling mill included. I recently purchased a rolling mill and will be using it just as soon as the new workbench is constructed. I know I'll be referring back to this section in the future. 


Section Five is on adding stones and beads.  Making a bezel and setting it, as well as flush settings are included. One of the projects is a cabochon brooch.  This project refers to instructions in lesson 20 later in the book on making a simple spring pin latch. 


Section Six is on advanced techniques such as making clasps, hinges,  marrying metals, solder inlay, and lamination inlay.  After reading this section I really want to started mixing metals using these techniques.  


This book is a great reference for someone new to soldering.  I really appreciated the inclusion of instruction in pin and hinge making, marrying of metals,  as well as use of the rolling mill as these subjects are not often covered. The writing is easy to follow and the book is arranged in a pleasing manner that is attractive and easy to read. The back of the book has the project templates, a ring sizing guide, circle divider, resource list, metric conversion chart and index.  


Wednesday, August 10, 2011

Bead Table Wednesday--Don't Look, Billye!

I've been working on a birthday present for my friend Billye the last couple of days.  I got this cool dimple tool from Richard Salley and it makes little bumps that look just like braille.  So I decided to make a pendant for Billye that says bff (best friend forever) on it in braille.


The first one I did I realized was too thin so I backed with brass.  It ended up being too big and not what I had in mind.  So I started over last night. 


Here's what I have so far:

braille pendant in progress

The photo is larger than life.  It's about half an inch wide and 1 3/4 inches long.  I'm going to put a dangle on the bottom and a pearl or something on the top and hang it on a silver chain. I did the tiniest textured edge with my hammer.  I still have to buff out some tiny scratches that were on the metal when I got it and put a patina on it. 


The other thing on the bead table is this awesome pendant by my friend Martha Eason of Menagerie Studio.  


house pendant by Menagerie Studio

Martha has a pendant in this month's Stringing magazine. It's shown on page 23 in a necklace by Suzette Bentley. 


And I have yet more brass etching that needs to go in a bath to remove the pink. Plus I have lots of earrings and other items that are waiting for their photos so I can list them. 

getting ready to list


I'm really slow getting things listed.  


Check out what's on every one's bead table at: