
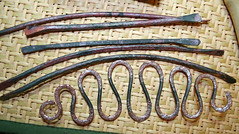
I used 8, 6, and 4 gauge wires.
I cut the wires into various lengths for cuffs and bangles. The bangles are all extra large size. This is so I'll be able to wear them. I very rarely find a commercial bangle big enough to go over my hand.
The next step was annealing the copper. I had never done this before. I was worried about dropping the hot wire on my foot when I quenched it so I dug my Doc Martens out of the closet. Probably I should have worn pants too, but it was about a 100 degrees outside. I did have eye protection and gloves.
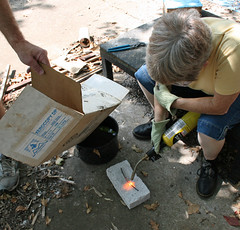
I enlisted my teen-aged son, Stefan, to take pictures. The sun was so bright that Ralph had to hold a piece of cardboard up to shade the work so I could see the orange glow. I used a fire brick that Ralph made a while back, after he figured out how much the shipping was on the bricks. Ralph kept saying things like, "I hope my brick doesn't explode." The brick was dry as a bone so I can't see why he thought it might explode.
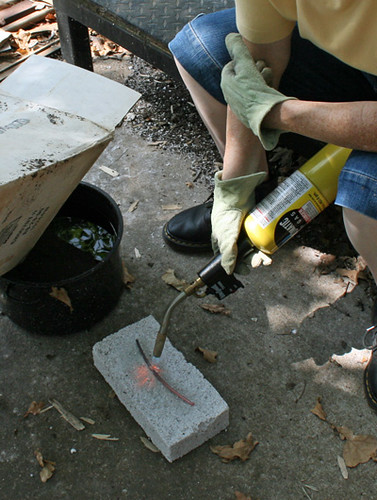
I torched the first wire until it had a nice orange glow, let it cool until the orange faded, then used pliers to pick it up and drop it into a pot of water. Ralph scared me by immediately reaching in to the water with a bare hand and pulling out the wire. I didn't realize that the copper cooled so quickly.
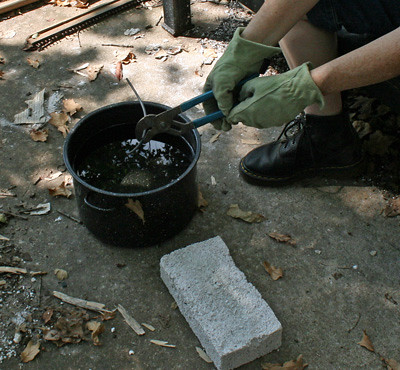
The wire went into the water completely black, but as it cooled bits of the oxidation flaked off revealing pinkish red areas. The top wires have been quenched. The bottom ones are before annealing.
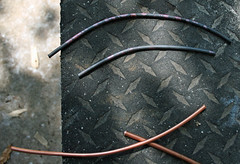
Stefan and I both picked up one of the annealed wires and accidentally bent it. That's how soft it got. I had no idea the change was that great.
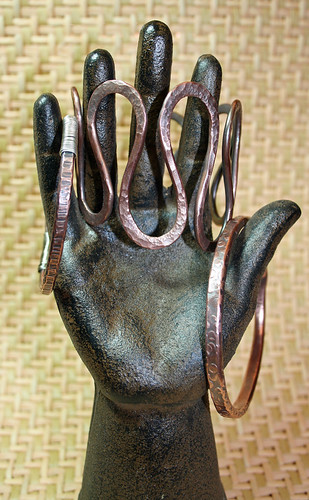
After annealing I hammered the wires flat on top and bottom with a planishing hammer and then used various texturing hammers to add interest to the bracelets. The ends of the wires were pounded flat into paddle shapes. The 8 gauge wire was formed into a serpentine shape before hammering. The serpentine shape was something I wanted to try. It isn't in the article. I had to anneal one of the thicker wires a second time to finish texturing it.
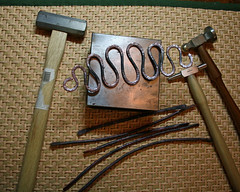
The bracelets were then annealed again. After this I shaped them using an oval mandrel for the cuffs and a round mandrel for the bangles. I also used a file to clean up the ends a little and round off the paddle shapes. I was going for rustic rather than "fine".
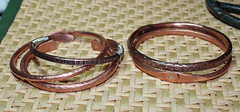
After shaping I put them in a pickle made of vinegar and salt, rinsed, and brushed them with a brass brush.
I used some silver wire for a rivet on the bangles. This was the first time I had done rivets. I did not ball the end of the wire as the article instructed, mostly because I was tired of cleaning the scale off. I don't have a draw plate either, so I used pliers and a regular anvil. I just hammered around the end until I mushroomed it. I lashed one of the cuffs with silver wire. This was a real pain. I had trouble tucking the ends under. I then antiqued three of the bracelets using liver of sulfur. I really liked the way they looked after that. I put several coats of Renaissance Wax on the antiqued ones.
I still have one more rivet to set. I'm going to put Art Clay on two of the remaining bracelets.
8 comments:
this was a very generous post, i too have always wanted to try this but was scared off by the fire, if you hadn't have shown this in such detail and valuable commentary i would never have tried, i really want to make work like this so i really appreciate you sharing, thank you, peace for all
Thanks, Ruralrose. I used a regular plumbers type torch with mapp gas, not a micro torch. It is very easy to use as it lights itself when you push a button.
Boy, my husband won't let me play with fire yet, lol. What a fun project. I'm going to show him so maybe he will relent, lol. I adore copper and I think you did a wonderful job on these. Very cool!
Lois
thanks for the follow up Leslie, peace
Thanks, Lois. My husband is sort of the mad scientist guy--actually he's a physicist. Anyway, he's always experimenting with something so he thinks it's cool when I try new things.
Looks like you were having fun! Hard work pays off! Nicely done... keep up the good work!
Thank you for this article - it's quite a mini-tutorial! You even mentioned safety aspects; how thoughtful of you!
Jutta
http://carassia.blogspot.com
Thanks! Wacking wire is a good stress reliever too. I have a new hammer that I'm looking forward to using sometime soon.
Post a Comment