
I've posted before on broom straw casting, but this time I'm going to go into a little more detail.
You will need:
- an inexpensive straw broom
- a water bucket big enough to stand the broom in
- some concrete blocks, lumber or something to brace the broom upright in the bucket
- sterling silver or fine silver scraps to melt
- a torch (we use a propane torch; probably a mini torch would be too small)
- a crucible to melt the silver in
- long handled pliers or other tool to manipulate the hot crucible, or a crucible with a handle attached
- safety glasses for use with the torch
- a small can or container of water
- small wood saw, or similar cutting device
- scissors
- string for binding the broom head
The first step is to prepare the broom. Cut off the broom handle about one foot or less above the top of the broom head. Then cut the stitching holding the broom head in shape. It's best to cut it in a lot of places and pull all the strings out. After the stitching is removed bind the broom with some string into a round cylindrical shape. Put the broom head in your bucket of water and soak until the straw is damp. This only takes a few minutes.
After the straw has gotten damp you need to brace the broom head upright in the bucket of water. We used some bricks we had around to do this.
Now use the torch to melt the silver in the crucible.


When the silver is fully melted pour it into the end of the straw head. Don't pour all of it in one spot. Move the pour around a little. Smoking and burning will occur.

Put the crucible down and turn your torch off. Use your smaller container of water and pour it into the broom head to cool the silver.
If you are outside, like we were, cover the crucible with something to protect yourself and any kids or animals from the heat. An old metal pot, a flower pot or something like that works fine.
Let things cool down for a minute and remove the broom head. Upend it over the large bucket of water, stick it in the water, cut the binding, and shake the broom out in the bucket. The silver will fall out into the water where you can fish it out when it cools. It cools quickly. Examine your castings. If you don't like them you can melt the silver and try again. There may also be pieces that are too small to use, but you can reserve them for the next time.
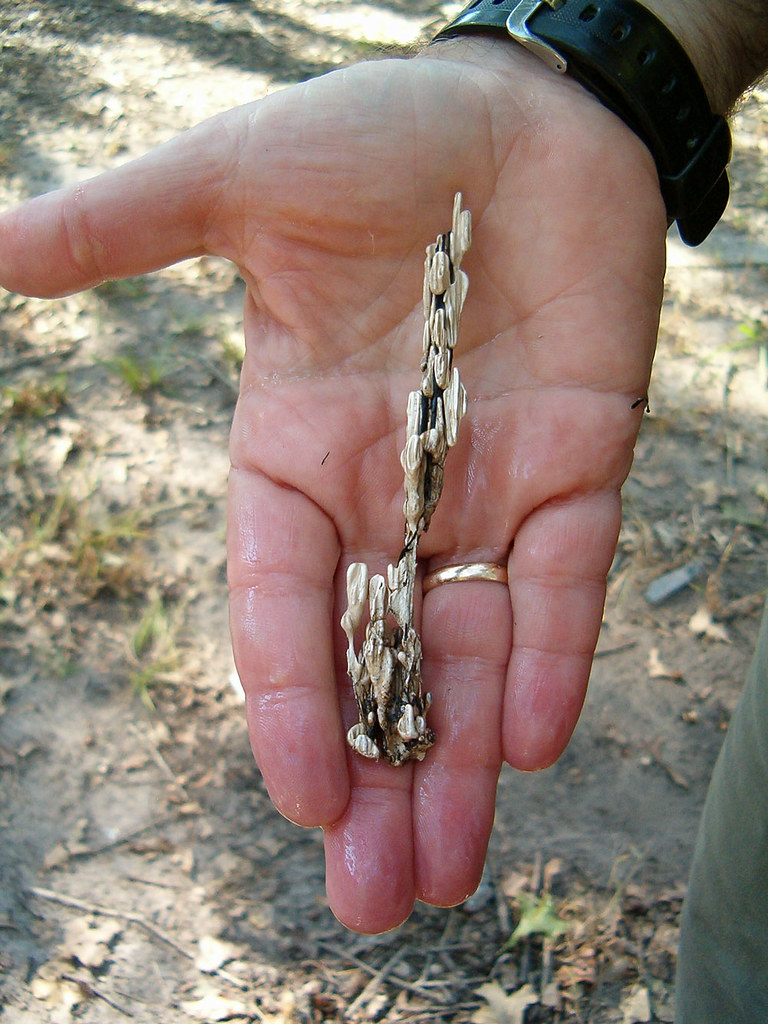
If you've used sterling silver you'll need to brush, then pickle the casting to clean it. If you used fine silver you'll just need to brush it.
Broom straw casting makes interesting organic shapes that can be made into pendants, rings, or pins.
Here's a link to a post I did on broom straw casting at Metal Chik with different pictures.
Here's a nice PDF article by Dennis Chapman. He goes into some detail on finishing.
Here's another article on finewire group at MSN with lots of pictures.
1 comment:
Wow- what an interesting article! I like the way you illustrated it , making it easy for us to understand.
Rena's site is my favorite one too and that is how I landed in your site. With her advise I launched a new website too. Hope you visit me there at Bead-z-mommys-business.com
Wish you all the success- Dita.
Post a Comment